Thursday, August 5, 2021

3D Art: Portfolio Three Week Four

 My Suffering Is Over

I finished sculpting the transformer for now. I would've liked to get into the really fine details but I couldn't swing it within 2-3 days, so the legs are a little simplified.


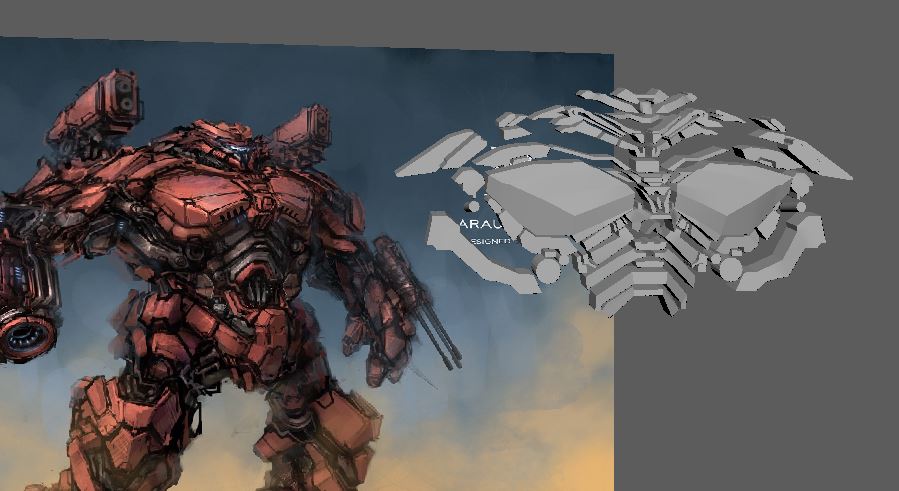
After wrestling with Zremesher, I ended up still getting errors when I went to unwrap my UVs, so I had to export my mid-res into Maya and automatically unwrap my UVs there. When I did a test bake with the torso last week, the textures were really low-res when everything was sharing a 4096x4096 texture, so I split everything up into eight texture sets.


It seemed to work and the textures turned out better this time. Because the sculpting took me so long the textures totally have the "Substance Painter" look since I didn't have time to tweak with them too much beyond making ID maps.


It is cool to be able to have this 3.4 million tri model in engine and it run fine, although it did take a minute for it to process the fbx.


My biggest hurdle and takeaway from the process has been how much planning needs to go into the UVs, because if you kind of wing it (like I did) it creates a lot more work towards the end of the process.


Monday, August 2, 2021

3D Art: Nanite

 Unreal Engine 5 Nanite Virtualized Geometry

Nanite lets you use much higher-polycount assets than what was previously possible with real-time art. It does this by rendering pixel-scale detail -- only detail that can be perceived -- and culling the rest of the geometry. 

Using Nanite

Any static mesh can be converted to nanite by just checking a box on import: the "Build Nanite" option under the Mesh panel.

Depending on the size of the mesh, it'll probably take a minute to import. During import, UE5 is sorting the triangles into clusters, and these clusters, depending on where they are in relation to the camera, will have their level of detail changed on the fly, essentially automating LODs.

UE5 has a Nanite Visualization mode that lets you see both the triangles and clusters of your model.


Just about any mesh is a good candidate for Nanite. If it's a high-poly model, if it's going to be occluding a lot of other Nanite, or if there are going to be a larger number of instances of that model, using Nanite will streamline things.


UVs and Texturing

Nanite meshes can be textured, but they use a slightly different workflow than typical game-res meshes. Both Quixel Mixer and Substance Painter can handle the high-poly meshes that you'd be using, the limit is based on your GPU and what your computer can deal with.


If you don't use zRemesher, you'll have to be proactive about your UVs and plan them ahead, UVing your base mesh in Maya before converting the Smooth Mesh Preview to Polygons and bringing it into Zbrush. Once it's brought into Zbrush, you won't be able to decimate or dynamesh, or you'll lose your UVs.

Overall, Nanite opens a lot of doors for real-time art, and has just a slightly different workflow for most game art.


Resources:


Nanite | Inside Unreal video demo by Epic Games


3D Art: Portfolio Three Week Three

 New Tactic + Getting Pieces in Engine

I'm still behind, but at least wanted something textured and in engine by today. The torso is mostly done, the biggest problem being the UVs. I scrapped what I had originally because I hated how it was turning out, and using the Draw Polygon tool to draw each individual face was soul-sucking, and made adding depth to each piece kind of a challenge.

My new plan was to make a relatively simple mesh that got the proportions and general silhouette of the robot, bring that into ZBrush, and extract the pieces I needed for the panels. I felt like I could get cleaner shapes this way.


My plan was to zRemesh these, using the polygroups to preserve the edges. The problem I ran into was that there were errors in the mesh that stopped zRemesher from working. This meant that I had to decimate the mesh before I could move forward, which means the topology isn't great and neither are the UVs. My mid-res mesh sits at 1.2 million polys.


I essentially have a little less than three days to get this ready for industry review. Since capstone and common art are ending tomorrow, I'm hopeful that if I dedicate all my time to finishing the legs and forearms I can have a more-or-less finished robot.

What I do have is in engine as nanite and seems to be working pretty well for being 1.2 million polys. I looked up the average height of a transformer, which was about 30 feet, so that's what scale I was basing this model off of.


Sunday, July 25, 2021

3D Art III: Portfolio Three Week Two

Modeling Continued

I'm still pretty far behind, since my goal was to have the box modeling in Maya done. I also still need to come up with what the back looks like, which I didn't consider enough when starting this project.

Hopefully this coming week I'll be able to dedicate more time to this project.


Saturday, July 24, 2021

VR: Summer Sprint Five

 Individual Contributions V

This sprint I was working on getting the MetaHuman to a static mesh state and getting the watch and moneycase textured.


I was at least able to use the retargeted animation to get the static mesh posed already rather than worrying about posing it myself by hand. What I need to still figure out is how to compromise on the grooming, or else we're just gonna have a totally hairless man show up on the other side of the door.

The moneycase textures were pretty simple.


The watch gave me a little trouble because it had some transparent elements, and I had issues with dithering (I think? I'm not sure what the term for it is) on the rest of the mesh.


I watched a tutorial that said using custom depth can fix this. The highlighted nodes are what's supposed to be specifying what's rendering.


I'm not sure if it's working too well because it's so small-scale, but I don't think you can see the issue to much in the game, so I might can get away with it.


Sunday, July 18, 2021

3D Art III: Portfolio Three Week One

 Research and Beginning Modeling

Since the plan for this was to have my research component be the nanite meshes in UE5, I looked into it beginning this week. I wanted to make sure that anything that needed to be done to the mesh, I was keeping in mind during the entire process.

I read the documentation and watched several videos on nanites, the most helpful one being the talk that Epic gave about it themselves. I wanted to be able to texture it and wasn't sure how that would happen if I wasn't doing retopology. Their workflow is to use Quixel Mixer, which can handle the one million+ polygon models. I've also used Mari before which is used more in film pipelines, and read that that software can also handle more dense models, so that would be another option. The programs support vertex color, but I couldn't find if UE5 did, so I'm going to need UVs too. My plan is to get the smooth mesh preview to polygons in Maya, then auto-unwrap that, and then just not use dynamesh or decimate the model so that I can keep the UVs on the high-poly.

I've started on the torso and hope to have the base mesh done by next week. I've been using the polygon tool to make these different parts but I'm not sure if I need them to be one continuous surface or if I can get away with having tons of little pieces.


I tend to underestimate hard-surface stuff and I'm already a little behind because I wanted to have the torso done by this week.


Wednesday, July 14, 2021

3D Art III: Portfolio Three Week Zero

 Proposal

1. Stylized Character

I'd like to do this stylized character so that I can use 3D Coat, which I wanted to do for the research component for class. I'd try to recreate the exact textures he has in the concept.


2. Hard-Surface Character

I also wanted to potentially do a more hard-surface focused character. I talked to Nick about it a little during a one-on-one and he thought getting to the high-poly level for this guy would probably take the entire month, so I would end the project with the sculpt only.


3. Devourer of Ghosts

This was my proposal for my personal project, but I haven't had the chance to work on it much at all. I really like the concept, but I'm not sure how much of it I could get done in a month.


Sunday, July 11, 2021

3D Art III: Portfolio Two Week Four

 Textures and Final Display

I wanted to try to use the trim sheet I had started in the diorama so that I wouldn't have the same repeatable texture over the walls and floors. I initially had it really clean-looking but the prop was rusty and it didn't really fit. I added rust to the trim sheet but I think it made it more recognizable as a tiling pattern.


I also got the prop and tileable texture done. I had to rush which sucks and I think it shows. I ended up applying a toon shader through post-processing since I like how it looks and I think it's kind of a cheat to make things look more unified.

For the tileable texture, I know last time the issue was that the pattern was really recognizable. I ended up making a much more simple texture this time around.


Friday, July 9, 2021

VR: Summer Sprint Four

 Individual Contributions IV

I worked on getting our bed in-game and adjusted the scale after some feedback that it felt small. I also got the pillow mesh updated and rigged. It has four joints to try to allow it to slump and bend and look a little more pliable.


I also got our dresser blueprint updated with new textured meshes. I added a cactus and desk fan into the scene along with a curtain for the window. These are taken from different UE4 projects that I've found on JR's account that I thought might make sense in a hotel room.

The dresser drawers have custom collision so that we can place objects in them.


I still need to address the MetaHuman issue, but since the lighting assignment was this sprint I'll get our alternative sorted out next sprint.