Saturday, February 27, 2021

3D Art II: Module Two Week Seven

 Texturing and Final Display of Work

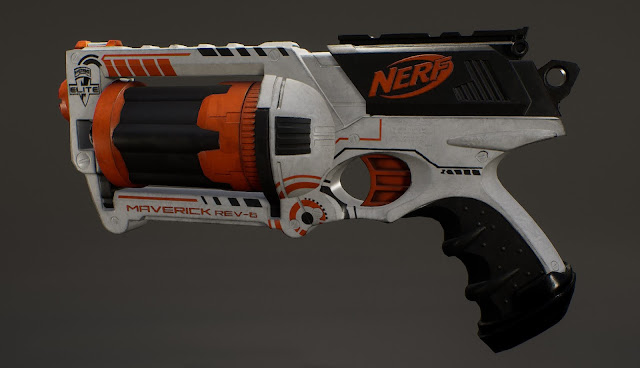
I finished my game-res meshes and UVs and got it into Substance. My polycount was 7,934 tris. I ended up with a decent bake aside from a spot by the trigger. I also got my ID map to finally work, and I used it to isolate the text.


IRay Renders:


I wanted to do this Whiteout version of the Maverick Rev-6:


I added some grime overtop, and tried to rein myself in, since last time with the knife I went a little too far with the aging and damage.

Unreal Renders:


Wednesday, February 24, 2021

Personal Project: Part I

 Concept Art: Devourer of Ghosts

For my personal project, I wanted to model an illustration by Tooth Wu, called Devourer of Ghosts.


Nick recommended getting everything proxy modeled and matching the pose in the image right away, rather than modeling it in a t-pose and then manipulating it from there. 

Once I'm selling the shape, movement, and flow of the image's pose, I'll start refining the creature elements on his right arm since creature art can be more forgiving in terms of what looks right or accurate. 

After I've done that, I can move onto the more challenging elements like the human anatomy and hard surface shapes on the model.

Monday, February 22, 2021

3D Art II: Module Two Week Six

 Game Resolution, UVs, and First Bake

I finished a few more sculpting things before I started with the decimation and everything.


A couple areas got pretty gnarly when they were decimated, specifically the text areas. For the slide on the back of the gun, I ended up just leaving that dynameshed and lowering the resolution a little for my high-resolution mesh.


I had a major setback with Maya while doing the retopology so I'm missing a couple pieces for my game-res, and my UVs still need to be done. This is my current bake in Substance.


Tuesday, February 16, 2021

The Art of Robo Recall

Notes


The Robo Recall talk was really insightful, but also made me a little worried about two elements of our own game. The first was lighting. The Art Director mentioned that they went with a very bright environment, since dark environments can lead to glare on the lens of the headset, and high-contrast things like white text on a black background can lead to a halo-ing effect.

Our VR project for No Country for Old Men is a very darkly-lit scene. I'd rather keep the lighting as it is if possible for the sake of the tone and setting. Both Chris and Nick brought up options for us like a day-for-night post-processing scenario, or just going along with the dark scene however bad the glare, and prioritizing the setting of the scene over the fidelity of the lighting.

The other concern was that the Robo Recall team found that, the more anthropomorphic the character, the more hesitant people were to shoot them in VR. The antagonist in our VR experience is a human. I'm not sure if we should try the Robo Recall route and make him less human and therefore less sympathetic, like some sort of Terminator coming after you, or if we should lean into the hesitancy people will feel. It could possibly give them a stronger incentive to go the stealth/passive route.

But overall it was a really interesting talk and made me consider several things about our project that I hadn't before.

Monday, February 15, 2021

Monday, February 8, 2021

3D Art II: Module Two Week Four

 Proxy Mesh and High Resolution Meshing, Part I

I went with the standard nerf gun to follow along more closely.


Friday, February 5, 2021

VR Immersive Experience: Sprint Two

 Team Three: Individual Contributions I


For this sprint, I wrote up the second version of our asset list, including whether or not that prop will need to be rigged or animated. I compiled the reference images that Eric had gathered and added any we were missing.

The complete list, I uploaded to Perforce.

I also made a ceiling fan proxy based on a diagram that included dimensions. I modeled the base and the blades separate so that when I brought it into Unreal, I could make a simple blueprint to make the blades rotate.


Finally, I added a cubemap to our scene's skylight, and gave the window panes a transparent, reflective material, to try to add at least something to the outdoor element for now. I'll keep looking into options we have on what we can get the outside to look like without modeling tons of extra things.

Monday, February 1, 2021

3D Art II: Module One Week Three

 Final Textures, Materials, and Render

I had to re-bake my maps from last week to deal with the splintering around the round edges. I also exported my decimated meshes as an .fbx instead of an .obj, since .fbx includes smoothing information. Then I textured the knife, going for a weathered knife.

Then I set up my material in Unreal and took some screenshots.